PLEG - How to create a Master dimmer to sync multiple lamps

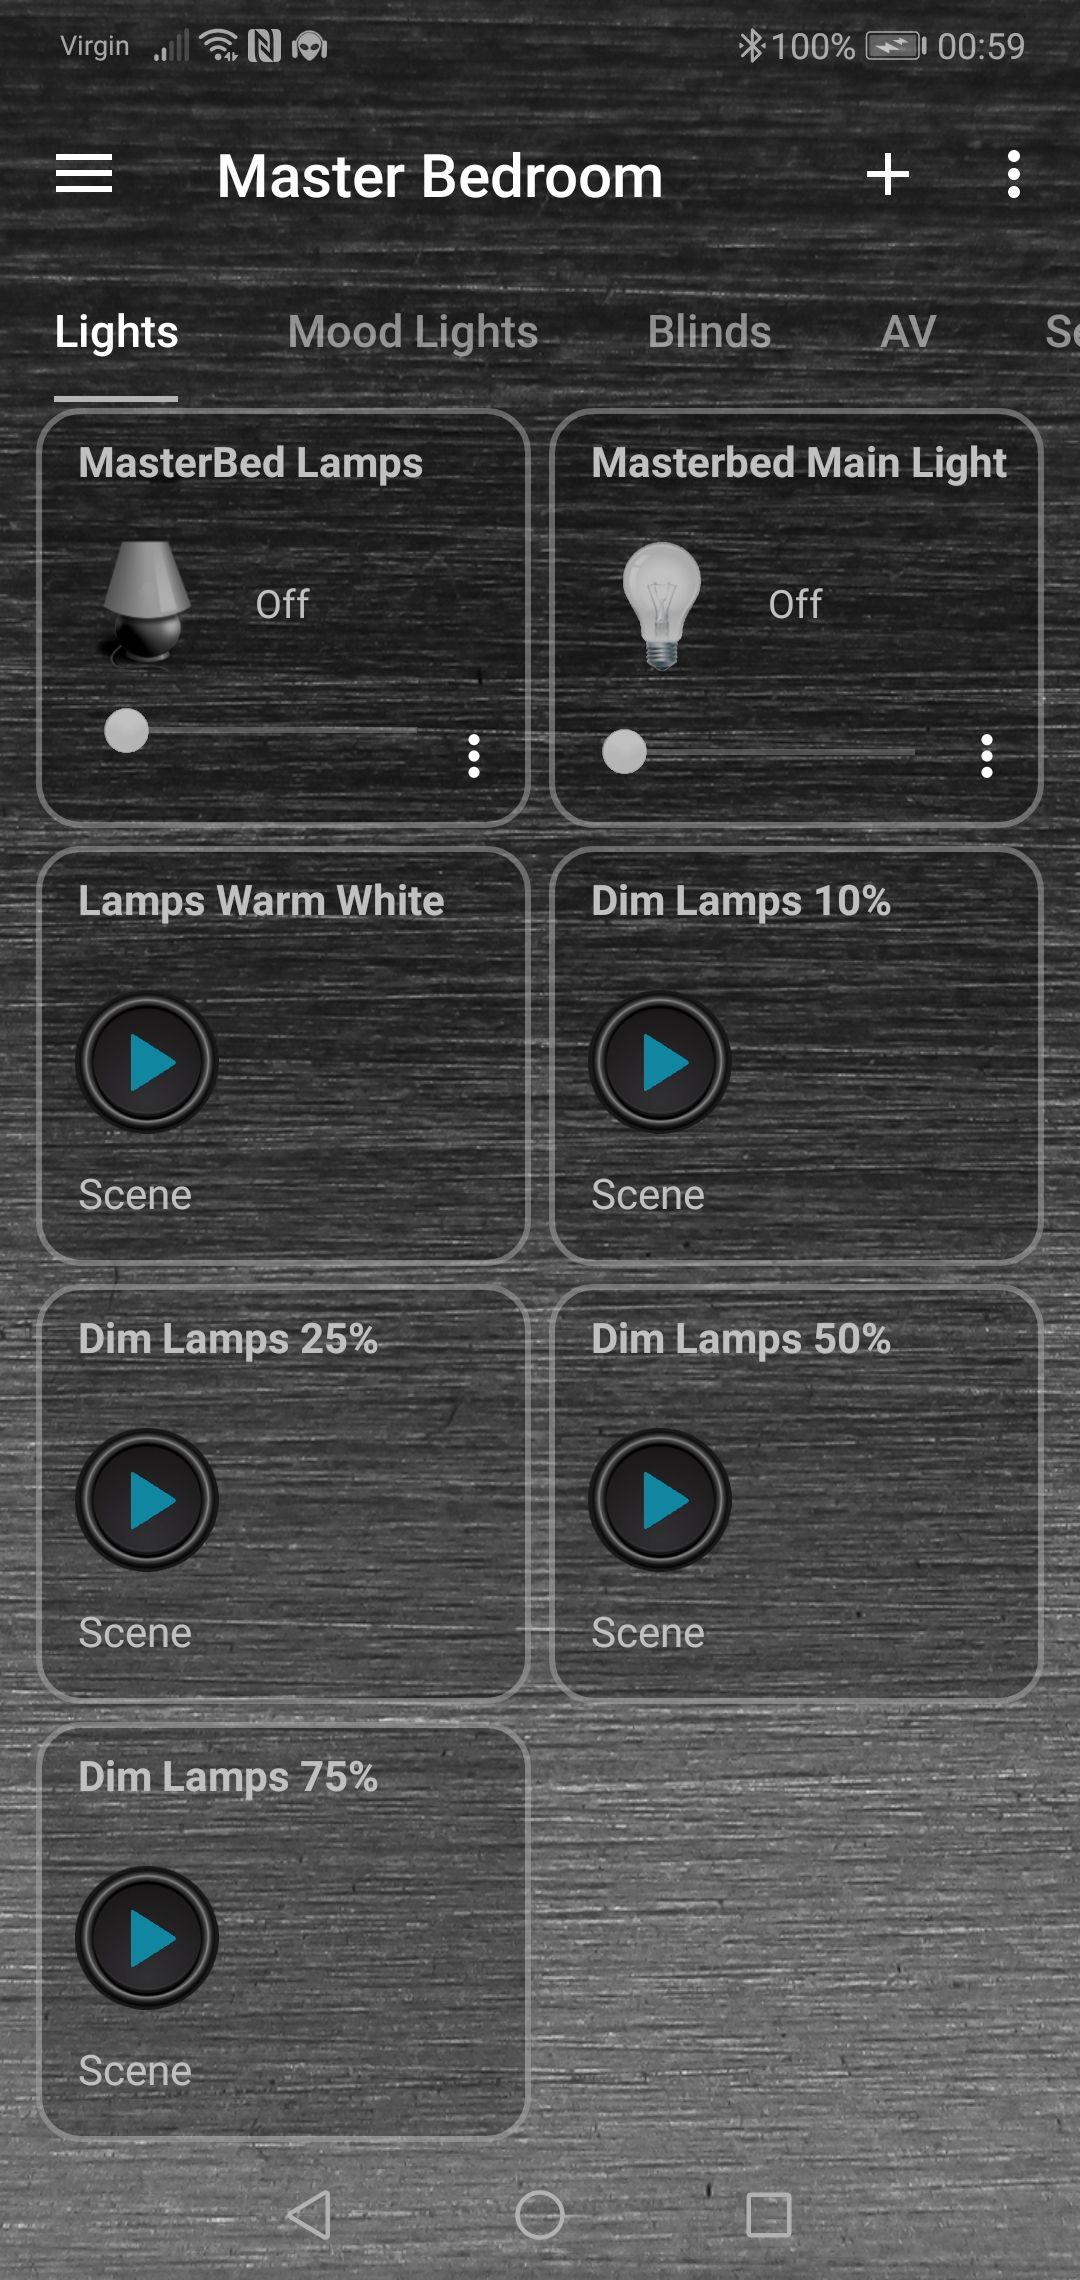
I was previously using Imperihome app and that had its own inbuilt Master dimmer widgets to control two or more lamps together.

e.g. Turn On / Off and adjust the dim level 0% to 100%

Since moving to Home Remote app that has no such feature.

As I am still using PLEG and haven’t switched to Reactor yet, I’ve set this up in PLEG.

This is for my side table lamps, so I have not tested with a physical wall switch also in the loop.

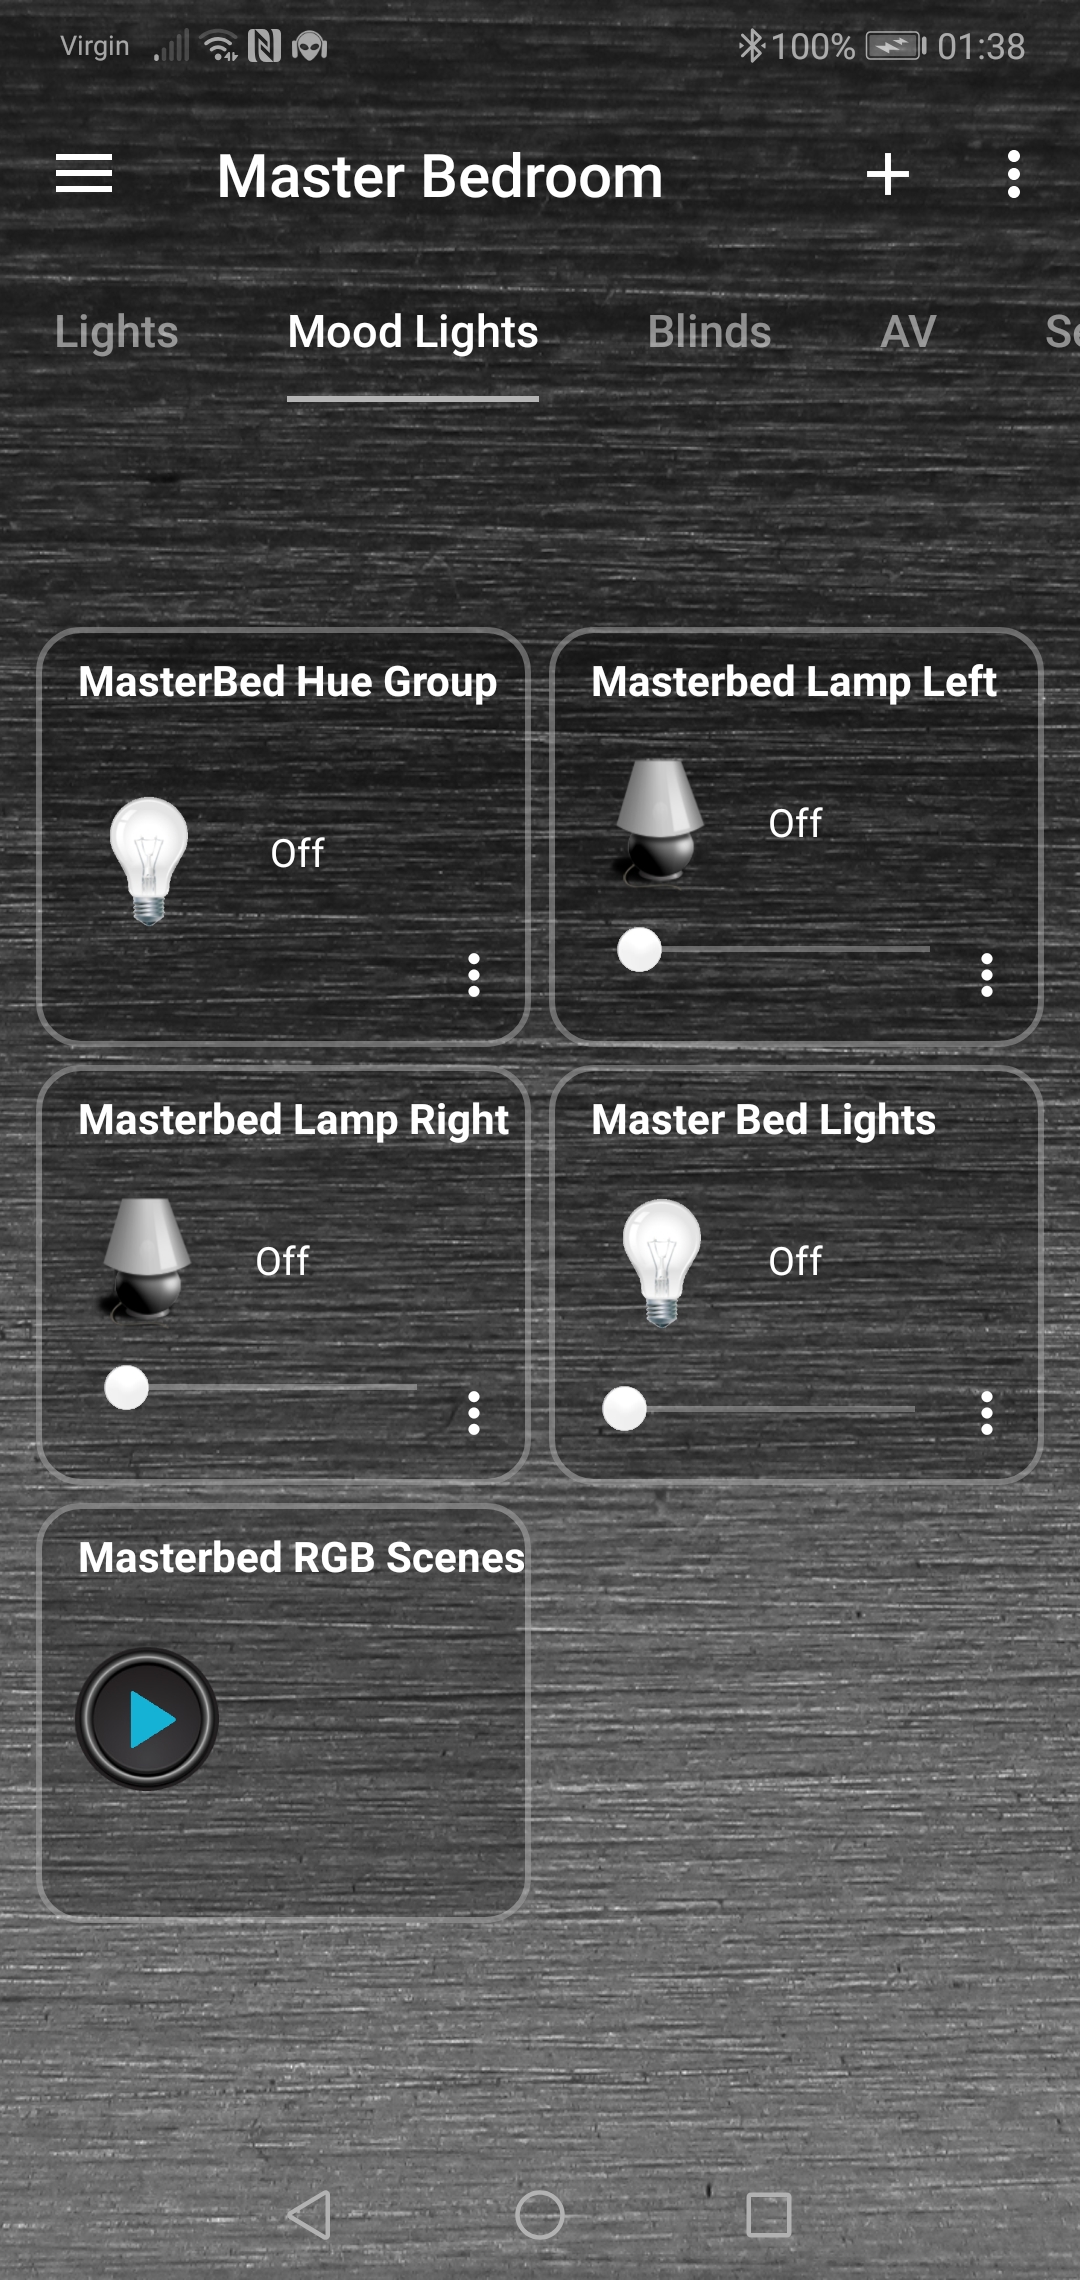
In this example I am syncing two side table lamps that are Zigbee smart bulbs.

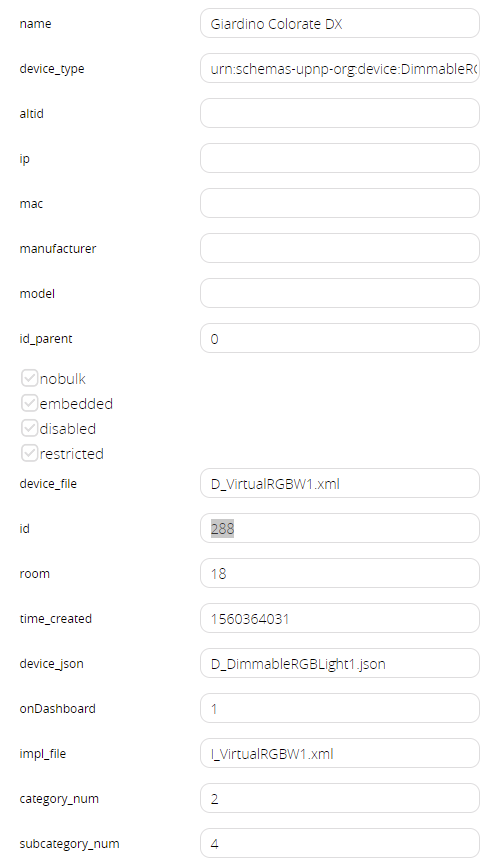
Step 1 - Create a virtual dimmer “Master” device in Vera.

You can use one of the Virtual Switch plugins to do this or you can manually create your virtual dimmer device in Vera, under Apps - Develop Apps - Create device, which is what I did.

image

device_type = urn:schemas-upnp-org:device:DimmableLight:1
device_file = D_DimmableLight1.xml
impl_file = I_DimmableLight1.xml
device_json = D_DimmableLight1.json
category_num = 2
subcategory_num = 0

Step 2 - Add the device Input in PLEG.

Logic Inputs - Device Properties

Create the Input for the “Master” virtual dimmer device. Under its Property select LoadLevelTarget

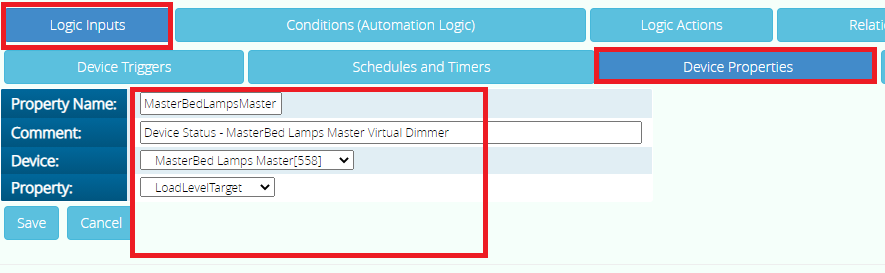
You need to remember the name of this Input you just created, in my example its:

MasterBedLampsMaster (Master virtual dimmer device)

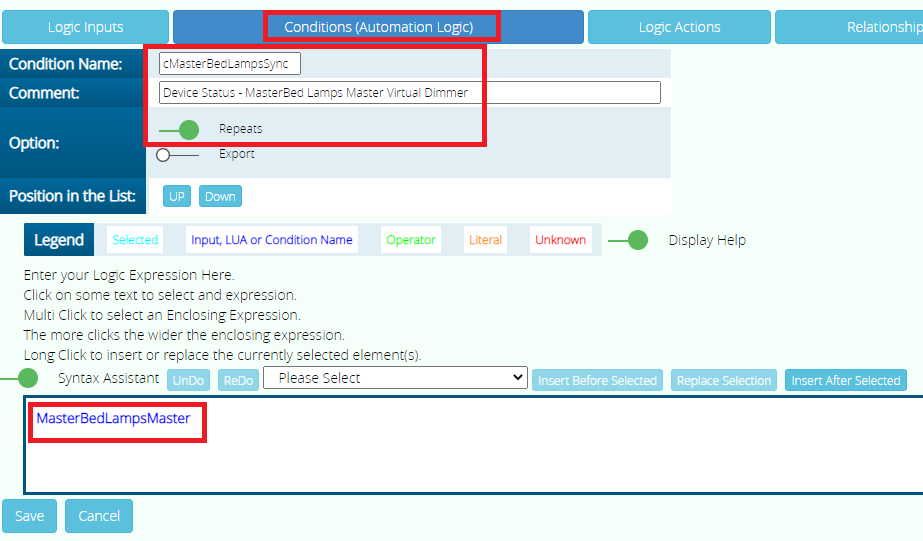
Step 3 - Create a Condition

In the Condition just enter the name of your “Master” virtual dimmer device that you specified in Step 2 e.g. MasterBedLampsMaster

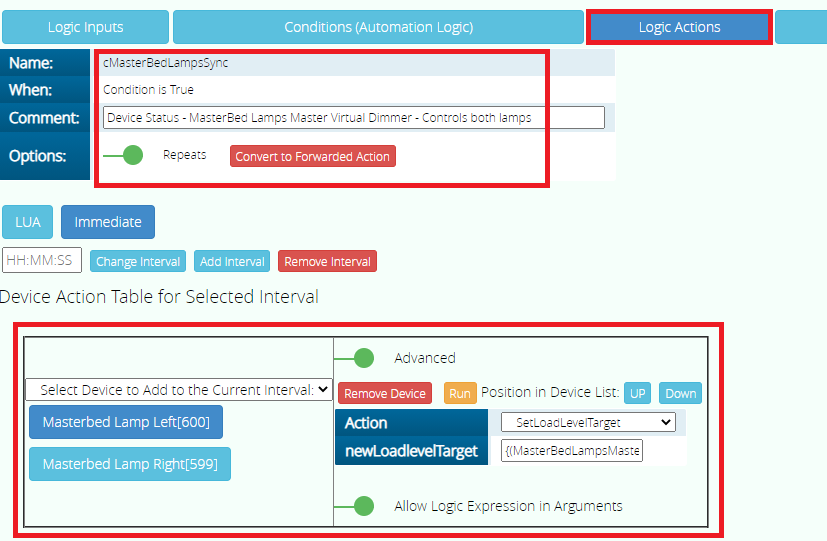
Step 4 - Create an Action

In the Action use the “Select Device to Add to the Current interval” drop down box and select the first real lamp.

In the Action field set it to “SetLoadLevelTarget”

Turn on the toggle button “Allow Logic Expression in Arguments”

Then type in to the “newLoadLevelTarget” field {(MasterBedLampsMaster)}

Where “MasterBedLampsMaster” is the name of Input of the “Master” virtual dimmer device you created in Step 2.

Add any additional “real” lamps and do the same as above for each one.

Save and Reload the LUUP engine.

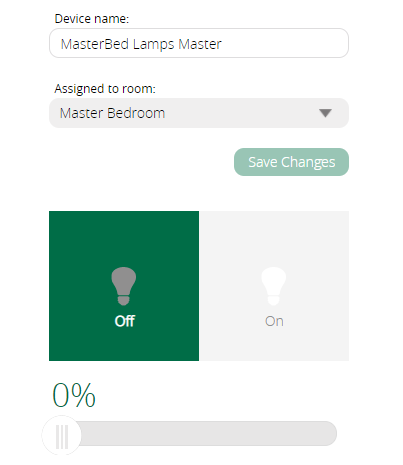
Step 5 - Test it works ?

In the Vera UI7 web GUI find your “Master” virtual dimmer device and turn it on, both lamps should turn on.

Move the dimmer slider to say 50% and both real lamps should then change to 50%

Turn off the “Master” virtual dimmer device and both real lamps should turn off.

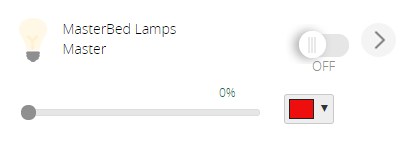
If your using the Home Remote app, you can now just add the “Master” virtual dimmer device in to your project page and have one tile to control both lamps.

image

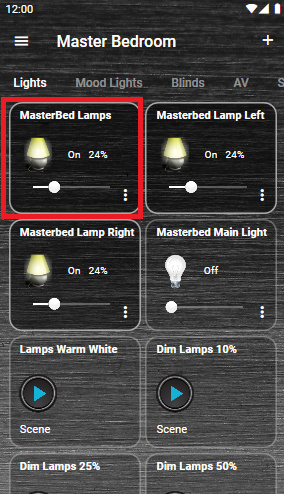
New look on my phone.

I could probably also remove those dim scenes I was relying on to dim both lamps together.

1 Like

Out of curiosity have you tried creating a device group with just those 2 dimmers and created a virtual dimmer in HR and bound it to that device group? I think there may be a workaround that way but I’m unsure if something can be bound to multiple devices. Maybe even building a simple plugin within HR too.

No I havent and that sounds above my skill level in Home Remote designer.

The “easy” solution seemed to me, to do it at the Vera end and create a virtual device to control both lamps and then just use that virtual device in Home Remote.

If your using Reactor you can do the same, but I couldn’t tell you how.

Your way does make more practical sense since you could change what lights are being controlled on Vera without having to constantly update your HR project

The obvious downside to using such a Master virtual dimmer device is I’ve lost white temperature and RGB colour control on the details page in Home Remote for this new tile.

I have a “Mood Lights” menu in Home Remote, I still have the individual lamp device tiles in there.

So I can still control the white temperature and as these side lamps are RGB bulbs also, I can change the colours.

For this aren’t you just able to change the details page the virtual device points too? Set it to the details page where you can customize the colour? Or does the virtual device not support colours etc. in Vera?

I’m biased, but I’m using my own virtual http devices plugin for the same reason.

You can just specify the commands on multiple lines, no need to code or use anything else.

This way I have a device in Alexa that groups all my roller shutters on second floor and I could operate them in sync (even if they’re in a different Alexa room). We use it rarely, because roller shutters are full automated, but it’s cool.

You could use it for dimmers as well. Colors will work as well.

This virtual device won’t support colours. And even if I changed the json templates to point to the RGB ones to make it an RGB dimmer, I can’t see how a virtual device can change colours of two lamps.

The virtual device is not linked to the two lamps other than what I setup in PLEG.

It would obviously need more coding like with @therealdb plugin.

Im not sure to be honest I will have to try it.

As I said, my virtual RGB device will support this. In fact, I just noticed I have one in place to sync garden’s lights colors.

In fact, I just have this into the corresponding variable:

http://127.0.01:3480/data_request?id=action&DeviceNum=312&serviceId=urn:micasaverde-com:serviceId:Color1&action=SetColorRGB&newColorRGBTarget=%s
http://127.0.01:3480/data_request?id=action&DeviceNum=313&serviceId=urn:micasaverde-com:serviceId:Color1&action=SetColorRGB&newColorRGBTarget=%s
http://127.0.01:3480/data_request?id=action&DeviceNum=314&serviceId=urn:micasaverde-com:serviceId:Color1&action=SetColorRGB&newColorRGBTarget=%s

%s will get replaced with the current value. This will work with dimmers as well.

No need to code anything: just be sure to repeat the commands. I was evaluating a simpler way to relay commands, but I’m busy with some work at the moment, plus it’s working well anyway, so it was pushed back in my todo list.

EDIT: I’ll add more guidance in the readme for this specific scenario as well.

1 Like

Sounds good I may have to install your plugin, just for that colour functionality.

I normally like to do things the hard way and just use PLEG and have no plugin for creating the virtual devices. Also your plugin never existed in the past.

I’ll have to have a think about colours and if I could get PLEG to change colours on multiple lamps?

sounds fair :slight_smile:

Yes, It’s just a call to urn:micasaverde-com:serviceId:Color1 SetColorRGB with newColorRGBTarget.

In my case I’m mixing both virtual, AltHue and regular Z-Wave devices. The service is the same, so it’s working regardless.

EDIT: I created this plug-in because I was tired of code/scenes/whatever to sync things, call external devices and so on.

@therealdb

When your plugin creates a virtual RGB dimmer device, what is the implementation file used ?

Using Apps - Develop Apps - Create device, I can create a virtual RGB dimmer, however it doesn’t work properly, when turning it on it says “Command failed”.

image

I have no RGB dimmer implementation .xml file template to upload to Vera.

device_type = urn:schemas-upnp-org:device:DimmableRGBLight:2
device_file = D_DimmableRGBLight2.xml
impl_file = ?
device_json = D_DimmableRGBLight2.json
category_num = 2
subcategory_num = 4

it’s a custom one (D_VirtualRGBW1.xml) but it’s 100% standard. So it’ll work with mobile apps, alexa, google home, ha-bridge and even Imperihome.

Can I use it for my virtual device ?

I’ve installed your plugin to see how it work.

Its created one device:

image

How do you create other devices and specify their device type? e.g. RGB dimmer.

Your plugin isn’t what I imagined.

So you manually have to change the device files to change the devices type?

RGB(CCT) Lights

  • Upnp Device Filename/Device File (2.0+, master/children mode): D_VirtualRGBW1.xml
  • Upnp Device Filename/Device File (legacy mode): D_DimmableRGBLight1.xml
  • Upnp Implementation Filename/Implementation file: I_VirtualRGBW1.xml

image

I’ve changed the device_file to D_VirtualRGBW1.xml and the impl_file to I_VirtualRGBW1.xml

But you don’t say what the device_type and device_json should be?

However I am unable to turn OFF the virtual RGB dimmer device. The button remains in the On position in the UI7 GUI.

I haven’t set any URLs yet in the Variables so maybe that is why.

Can you give an example URL to turn on / off a Vera lamp ? And in to which variable field should it be entered?

I also seem to have variables with the same name but different service IDs

SetPowerURL - urn:bochicchio-com:serviceId:VirtualBinaryLight1
SetPowerURL - urn:bochicchio-com:serviceId:VirtualRGBW1

SetPowerOffURL - urn:bochicchio-com:serviceId:VirtualBinaryLight1
SetPowerOffURL - urn:bochicchio-com:serviceId:VirtualRGBW1

Maybe I did it wrong changing the virtual device from a binary light to a RGBW dimmer.

well, it’s written in the readme portion you copied here. No need to install it from the store, just grab those files, create a new device and set the options during the installation. Unfortunately, the store has no option to just install the files without a new device being created.

yes, this plug-in has outgrown me :slight_smile: so they’re different. I’m planning for a V3 to join the same serviceID under one and add some UI to easily create them. It’s all manual, and I stopped because of the lack of progress of Vera FW (I didn’t want to invest into something DoA).

Some screenshots:

This is for my own system, talking to milight via HTTP.

" Manual Installation - To install, simply upload the files in the release package, using Vera’s feature (Go to Apps , then Develop Apps , then Luup files and select Upload - multiple files can be selected when uploading). To create a new device under Vera, go to Apps , then Develop Apps and Create device . See later for instructions on how to insert the values."

OK that makes more sense to me than installing the plugin from the app store.

1 Like