Plugin: DelayLight

Hi rigpapa

A few years ago, I was battling how to tell if a light has been turned on automatically by movement or manually at the switch. I solved it using a PLEG and it has served all my lighting requirements for a long time.

When I came across your thread, I thought WoW this is exactly what I need to get rid of a lot of complicated PLEG expressions and make my VERA run a little bit more smoothly (hopefully). So I bypassed my Internal Light PLEG (and External Light PLEG) and replaced them with your DelayLight Plugin. I have been running like this for a few weeks, but have reluctantly now gone back to my PLEG solution.

I have been “fighting” my lights. i.e. I turn my kitchen light off and your plugin immediately turns it back on or vice-versa. I never had this problem with my PLEG solution.

I am the first to admit my logic is basic, but the following was built on practical evaluation. Somewhere there is a key difference between what you are doing and what I am doing in PLEG. It makes me sad to go back to PLEG and would much rather use your solution. If you would comment so I can use your Plugin without any problems, I would be very happy.

I have four conditions in a PLEG;-

  1. cLightOn = VERA turns the light on automatically by movement at night
  2. cManualOn = The light has been turned ON manually by a person
  3. cLightOff = VERA turns the light off automatically
  4. cManualOff = The light has been turned OFF manually by a person

After much experimenting, I used the following expressions for each of the above;-

  1. cLightOn = (cManualOff ; tMotion > 10:00) AND !tLightOn AND tNight AND tMotion AND (!tLightOn ; tMotion)
  2. cManualOn = tLightOn AND !(cLightOn ; tLightOn < 10 )
  3. cLightOff = tLightOn AND !tMotion AND (!tMotion ; NOW > 3.00) AND (!cManualOn OR (tLightOn ; NOW > 29:00))
  4. cManualOff = !tLightOn AND !(cLightOff ; !tLightOn < 10 )

To look more closely at each;-

  1. cLightOn = (cManualOff ; tMotion > 10:00) AND !tLightOn AND tNight AND tMotion AND (!tLightOn ; tMotion)

This means automatically turn the light ON, when ALL the following are TRUE;-

• (cManualOff ; tMotion > 10:00) = It is at least 10 minutes since the Light has been turned off at the switch
• !tLightOn = NOT LightOn i.e The Light is currently OFF
• tNight = it is dark (defined elsewhere)
• tMotion = The room is occupied
• (!tLightOn ; tMotion) = Motion AFTER the time that the light went OFF (!=NOT)

This last condition was necessary to prevent the Light being immediately turned back on after I turn it off manually. My light switch is within range of the motion sensor, so tMotion will be True, but its time stamp will be BEFORE the time the light was turned off. This prevents the light being turned back on until new motion AFTER the light has been turned off)

  1. cManualOn = tLightOn AND !(cLightOn ; tLightOn < 10 )
    The expression in brackets is true if the light turns on less than 10 seconds after a command to turn the light on automatically. It is then likely to be an automatic On. The “!” negates that, so the Light is ON but it was turned on manually.

  2. cLightOff = tLightOn AND !tMotion AND (!tMotion ; NOW > 3.00) AND (!cManualOn OR (tLightOn ; NOW > 29:00))

This will turn OFF the light, when ALL the following are TRUE;-

• tLightOn = The Light is ON
• !tMotion AND (!tMotion ; NOW > 3.00) = there is NO motion NOW and the last motion was more than 3 minutes ago
• (!cManualOn OR (tLightOn ; NOW > 29:00)) = Turn light OFF when AUOMATICALLY turned on, 3 minutes after last motion
OR after 29 mins if turned on MANUALLY (plus more time if motion continues).

  1. cManualOff = !tLightOn AND !(cLightOff ; !tLightOn < 10 )
    This works out if the Light has been turned OFF manually in a similar to the Manual On above

To summarise:-
A Light turned OFF manually will not come back on for at least 10 minutes
A Light turned ON manually will stay on for at least 29 minutes, and will stay on while motion continues; only turning off 3 minutes after motion ceases, and I get no “fighting” problems.
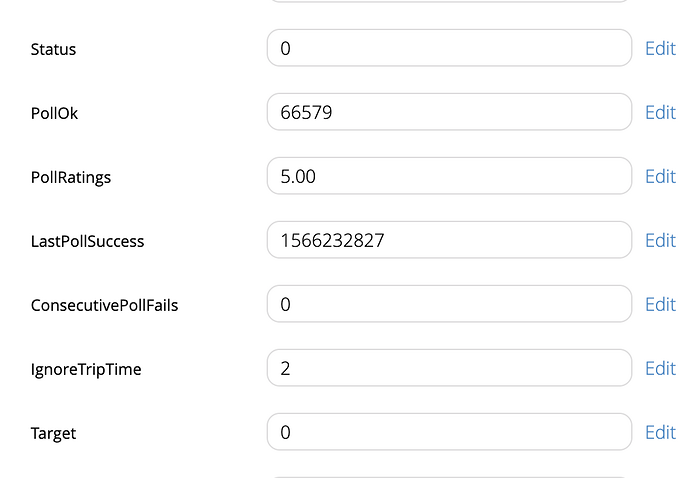
What I really need to see is your DelayLight configuration. On the bottom of the Settings tag is a “Plugin Status” link. Please PM me that output (do not post it in this thread–PM directly to me) and I’ll take a look.

OK. Not seeing your config but drawing on your description of the problem… version 1.10 is now released, and includes a new feature called “trigger quieting”. The quieting period is a “dead time” during which the triggers are ignored if all lights are turned off manually. This ensures that any motion event that occurs as you leave the room does not cause automatic triggering and bring the lights back on (only a problem for certain sensor configurations and room configurations, but also not rare–surprised it took this long for it to come up).

Hi Rigpapa, I came home today after a short break, bypassed my PLEG & re-instated your plug-in to send you that config, but for the life of me I couldn’t reproduce the fault. After I read your post, I know why! Thanks, the dead time variable has done the trick! Quick work and much appreciated.

One last question, I have set the holdover mode to option (2) “do not start the timer until triggered sensors reset”. I don’t want the light to go off if I come back into the room, so will the timer be abandoned if motion re-occurs?

No problem. The default for quieting is 0 (seconds), which is consistent with how previous versions would operate, so if you’re not able to reproduce your specific condition and quieting is 0, you’re probably just getting lucky (the timing of the motion sensor’s messages to the Vera factor in and can make for some non-obvious state transitions). So you may still need to experiment there a little and probably move quieting up to a few seconds.

The default mode will work, you don’t really need mode 2. Any motion sensor trip restarts/extends the timing period. It won’t hurt, but I’m guessing your motion sensors have pretty quick resets (which is why you were having the original problem), so the effect of mode 2 is minimal.

Garage Door Left Open Notification

Hi rigpapa,

I followed your Github instructions to add a door left open notification;-

1. Create a new timer device (see Adding Timers above);
2. Set the automatic timing period to 5 seconds, and the manual timing period to 0;
3. Set the trigger device to your garage door open/close sensor;
4. Set the “on” delay to the limit (in seconds) that the door is allowed to be open (e.g. 1800 = 30 minutes);
5. Go back to the Control tab, and hit the Notifications tab (you may need to scroll to see it);
6. Add Notification for: Timing State Changes
7. State: device starts off-delay timing
8. Select the users to receive notifications, then hit Add.
9. Use the “Back” button in the tab strip (not your browser’s “back” button) to exit configuration for the timer–this will cause a Luup reload.
10. Once Luup has reloaded, make sure your new timer is enabled, and give it a try.

But when I open VeraAlerts and tab into “Configure Notifications” (as per Richard Scheafer’s instructions Vera Alerts - Vera Plugin for Notifications), I get this error;-

VERA IP address says
Trigger Description error: SyntaxError: Unexpected identifier

When I remove your notification, I don’t get any error in VeraAlerts?

I would say that’s something to be worked out in VeraAlerts.

Ok rigpapa, I’ll do that :smiley:

Installed 1.10 today and added my door lock as an automatic trigger but… it doesn’t seem to work. How is this supposed to work? When I unlock the door, I was expecting the light to turn on and visa versa but maybe I’ve missed something?

Interesting. So it looks like the new firmware sets Target and Status in the urn:upnp-org:serviceId:SwitchPower1 service on the lock device initially, and then does not update them. The lock service (urn:micasaverde-com:serviceId:DoorLock1) has its own Target and Status that do operate correctly, and this is what locks have always used. But the addition of the two SwitchPower1 variables makes luup.device_supports_service() think the device now supports SwitchPower1, so when DelayLight is evaluating the device for how to trigger from it, it first sees the SwitchPower1 service implemented on the device, and so sets up to watch it as a switch (using Status in SwitchPower1) rather than a lock (Status in DoorLock1). Then, because the firmware does not update those SwitchPower1 variables after creating them, DelayLight never sees the lock changing state.

I can work around this easily in DelayLight, but it’s a firmware bug (two bugs, actually). Stay tuned…

EDIT: Interesting… it does update those variables, but not immediately when the lock changes state… seems to be when it polls the device… that’s even stranger…

Edit 2: bug report

OK. Workaround is up in stable branch on Github. You only need to install the L_DelayLight1.lua file (right-click and choose “Save Link As…” to download, then upload it to your Vera and reload Luup).

Edit: also, just FYI, I have for some time been chasing an issue in 7.0.29 with my Schlage BE469 where the status is not reflected immediately when the lock is operated manually (e.g. by the handle, not using Vera UI or the lock’s keypad). I haven’t fully developed that bug report yet because I’m trying to resolve an inconsistency: sometimes it works (immediately) and sometimes it doesn’t. It seems like it’s related to non-use of the lock for an extended period, like perhaps the lock is going into a low-power/sleep mode. Anyway, be aware, your mileage may vary when relying on lock status; there be monsters there.

Thanks @rigpapa

Version 1.11 is now released for all platforms/stores. This version works around an issue with lock implementation that causes locks to be seen as switches, even though they can’t be controlled like switches. Only users with the need to trigger DelayLightTimers from locks need to update to this version. It is otherwise the same as 1.10.

rigpapa, first of all Thank You for creating yet another great piece of software for the benefit of our community! Is it possible to trigger a DelayLight instance using a scene?

My Linear garage door opener has a built-in sensor and doesn’t appear in the list of “trigger” devices to choose from in DelayLight. I created a scene that will return true whenever the door is opened; I want to use this as the trigger for a DelayLight, with my ultimate goal being to use your tutorial on the github README for an alert if the garage door is left open for X minutes.

If you can’t use the garage door sensor as a trigger directly, the Github cookbook won’t work–it relies on direct status from the sensor. I recommend using Reactor, which can provide the full solution to your problem (it has the ability to time-delay a response–see the tutorial videos) with a more comprehensive triggering capability.

Also, is your garage door sensor listed as a separate child device of a parent garage door control? If so, please go in to the Advanced tab on the device control panel, and reply here with the values from device_type, categogory_num, and subcategory_num.

The linear garage door opener essentially acts as a light switch . I do not see it as a child device.

device_type: urn:schemas-upnp-org:device:BinaryLight:1
category_num: 32
subcagegory_number: 0

If it doesn’t expose the sensor as a child device, you can’t use it as a trigger directly. Do you know where it writes the sensor state?

The sensor state is basically a switch status. It writes to ‘Status’ and ‘Target’ like most other switches I think.

OK. You can’t use a switch status as a trigger in DelayLight, and I think it would be too dangerous for me to enable that behavior without making people think about it–the possibility for creating logic loops due to a misunderstanding about what device needs to go in what field is high, and the results would be tragic.

You have some options, though. Two that immediately come to mind:

  1. Install Reactor, and create a ReactorSensor that merely tracks the state of the Status variable. ReactorSensors are implemented as binary sensors, and binary sensors are exactly what DelayLight wants in the trigger list. Now, that’s a big bat to hit the problem with, but on the plus side, it has myriad other uses, I think you’ll find.
  2. Install VirtualSensor. The current version of VirtualSensor allows you to create a virtual binary sensor whose value is copied from or matched to any state variable on any other device, so you can do what Reactor would have done above “on the cheap” by just having your virtual binary sensor copy its state directly from the garage door’s Status variable (which is also a binary value). You can then use this virtual sensor as a trigger in DelayLight. While VirtualSensor is more limited in its utility, this is exactly the kind of problem it’s intended for, and it’s a trivial plugin–very light weight.
1 Like

Thanks rigpapa. I had already gone down the path with both of your plugins for several other automations and indeed it is an easy solution using Reactor and VirtualSensor .

I just came across this thread and saw that it was left open and wanted to share how the Linear garage door openers are configured.

1 Like