Pardon the dumb question, Garrett, but is Vera a scene controller? If not what is an example of one.
This is an example Leviton scene controller:
http://store.homeseer.com/store/Leviton-VRCS4-M0Z-Z-Wave-4-Button-Scene-Controller-P611.aspx
The buttons can be used to trigger scenes, in Vera for example, and Vera can control its LEDs. Typically scene controllers don’t control a load directly, instead the tell the regular ZWave switches when to turn on/off
Thanks, Guessed.
The reason I asked is that there is a device in Vera called a _Scene Controller. However, as I look more closely, it appears to be a template for the device you pointed me to … although that is a guess. I don’t really know its purpose.
Trying hard to learn this stuff. Not much out there to read other than this forum which is a great help.
[quote=“jimshaughn, post:23, topic:164851”]Thanks, Guessed.
The reason I asked is that there is a device in Vera called a _Scene Controller. However, as I look more closely, it appears to be a template for the device you pointed me to … although that is a guess. I don’t really know its purpose.
Trying hard to learn this stuff. Not much out there to read other than this forum which is a great help.[/quote]
Is the _Scene_Controller labeled #2_Scene_Controller? If this is the case, that is Vera itself. This is mostly hidden in plain site and only shows up when creating scenes etc. Not sure why it is not hidden complete. I am sure it has some purpose to be seen in some scenarios. As guessed pointed out what a scene controller is, to answer your question, yes vera is like a large scene controller. Hence the reason for the #2_Scene_Controller device in Vera.
- Garrett
Nope. It is not #2_Scene Controller, just _Scene Controller. Device ID 15, but ID is 1. 15 is the lowest device number in my system. So it is Udoubedly Vera, as Garrett suggests. I am on a Vera Light, in case that matters.
Hello,
I have a Vera Lite as a controller, a termostat EVR_ST814 and plug-in EVR_AN1582.
I have to implement next functionality:
- When I’m at home the termostat (Associated with plug-in) manages a heater.
- When I’m away then the heater must be switched off independing on the termostat.
Termostat has variable parametrs Ton = 20 C and Toff = 25 C (device option 2 and 3). If the current temperature is below Ton then trigger switch on, if current temperature is above Toff then trigger switch off. Unfortunately, the termostat doesn’t send status of the triger to Vera Lite directly and I can’t use the features of scenario to switch it off only associated mode.
But I can change the parametrs Ton and Toff via GUI. In this case I can set up Ton = 0 Toff = 2 and current temperature will be below and heater will be switch off all the time.
There is a question:
Can I change the parametrs (Device option 2 and 3) Ton and Toff via LUUP and could somebody show me an example or template?
Thank you in advance.
Denis
Hi,
I am also trying to send Configuration settings to my siren.
The target is: 10 seconds only flashing the light. (variable 0, 1Byte Dec, 2)
After this time send new configuration settings and switch the sound on.(variable 0, 1Byte Dec, 0)
How can I fix this?
Can someone please post this elegant solution… It’s hidden behind a google document link.
[quote=“Ap15e, post:6, topic:164851”]Found a quite elegant solution to the problem.
Link to source code:
It took me a while to figure this out, but finally the solution was very simple. Hopefully this will help someone along the way
[sub]luup.variable_set( “urn:micasaverde-com:serviceId:ZWaveDevice1”, “ConfiguredVariable”, “[Parameter no],[bytes for ex 1d],[Parameter value]”, Device ID )
luup.variable_set( “urn:micasaverde-com:serviceId:ZWaveDevice1”, “VariablesSet”, “[Parameter no],[bytes for ex 1d],[Parameter value]”, Device ID )[/sub]
For example here I am setting the max dim level of a Fibaro dimmer to 15% by setting variable 12 which is 1 byte decimal to the value of 15:
[sub]
luup.variable_set( “urn:micasaverde-com:serviceId:ZWaveDevice1”, “ConfiguredVariable”, “12,1d,15”, 48 )
luup.variable_set( “urn:micasaverde-com:serviceId:ZWaveDevice1”, “VariablesSet”, “12,1d,15”, 48 )[/sub]
IMPORTANT: Use the advanced tab in the scene and execute a “Reconfigure command” - This will send the parameters to the device.
You can set multiple parameters at once by serialising the command, ie:
[sub]luup.variable_set( “urn:micasaverde-com:serviceId:ZWaveDevice1”, “ConfiguredVariable”, “4,2d,6000,3,1d,1”, 95 )[/sub]
which is parameter 4, 2bytes decimal, value 6000, parameter 3, 1 byte decimal, value 1
The parameters will not take effect until you send and complete the reconfigure command.
Maybe someone can help me figure this out. I just got a new aeon labs doorbell, and I want to be able to change the ringtones on the fly depending on the scenario. I found the info for this via the zwave alliance (Product Configuration Capabilities), so I should be able to change it via a parameter set:
Parameter Number Parameter Size Parameter Name Parameter Values
6 1 Select a ringtone to play. Value Description
0 Stop playing.
From: 1 To: 100 Play the specified ringtone.
Anyway, I’m trying to figure out how to send say a value of 5 to parameter 6 via zwave senddata, but I don’t understand the hex in the data package… the command vera lists in the example here (http://wiki.micasaverde.com/index.php/Luup_UPnP_Variables_and_Actions) shows:
- Set parameter 29 to “3” on node 15:
luup.call_action(“urn:micasaverde-com:serviceId:ZWaveNetwork1”, “SendData”, {Node=15, Data=“x70 4 29 1 3”}, 1)
Can someone please explain to me how they get “x70 4 29 1 3”???
I managed to figure it out for the doorbell using another online example, but I still wouldn’t mind a good explanation if anyone has the time, if not no bigge. Thanks!
[quote=“jhanson999, post:30, topic:164851”]Anyway, I’m trying to figure out how to send say a value of 5 to parameter 6 via zwave senddata, but I don’t understand the hex in the data package… the command vera lists in the example here (http://wiki.micasaverde.com/index.php/Luup_UPnP_Variables_and_Actions) shows:
- Set parameter 29 to “3” on node 15:
luup.call_action(“urn:micasaverde-com:serviceId:ZWaveNetwork1”, “SendData”, {Node=15, Data=“x70 4 29 1 3”}, 1)
Can someone please explain to me how they get “x70 4 29 1 3”???[/quote]
I came across this post as I was investigating the possibility for changing sensor behavior based on a variety of triggers.
Looking at [url=http://www.vesternet.com/resources/application-notes/apnt-90]http://www.vesternet.com/resources/application-notes/apnt-90[/url] I discovered the following:
47 = Z-Wave Device ID 112 = Configuration Command Class 4 = SET 37 = Parameter 2 = Size 3 = "Value" from the short-cuts detailed above for the "Sound" required 1 = "Value" from the short-cuts detailed above for the "Volume" required
So x70 in our case is again the configuration command class (112) (Take a look at [url=http://wiki.micasaverde.com/index.php/ZWave_Command_Classes]http://wiki.micasaverde.com/index.php/ZWave_Command_Classes[/url] for a full list)
The command value comes from here [url=http://zwavepublic.com/sites/default/files/SDS13740-1%20-%20Z-Wave%20Plus%20Device%20and%20Command%20Class%20Types%20and%20Defines%20Specification.pdf]http://zwavepublic.com/sites/default/files/SDS13740-1%20-%20Z-Wave%20Plus%20Device%20and%20Command%20Class%20Types%20and%20Defines%20Specification.pdf[/url] and [url=http://z-wave.sigmadesigns.com/wp-content/uploads/2016/08/SDS12657-12-Z-Wave-Command-Class-Specification-A-M.pdf]http://z-wave.sigmadesigns.com/wp-content/uploads/2016/08/SDS12657-12-Z-Wave-Command-Class-Specification-A-M.pdf[/url]:
#define CONFIGURATION_VERSION 0x01
#define CONFIGURATION_GET 0x05
#define CONFIGURATION_REPORT 0x06
#define CONFIGURATION_SET 0x04
So set = 4
and then it’s parameter, size, value.
Hope this helps others as a future reference.
Thanks,
Tsvi
[quote=“blingal, post:29, topic:164851”]It took me a while to figure this out, but finally the solution was very simple. Hopefully this will help someone along the way
[sub]luup.variable_set( “urn:micasaverde-com:serviceId:ZWaveDevice1”, “ConfiguredVariable”, “[Parameter no],[bytes for ex 1d],[Parameter value]”, Device ID )
luup.variable_set( “urn:micasaverde-com:serviceId:ZWaveDevice1”, “VariablesSet”, “[Parameter no],[bytes for ex 1d],[Parameter value]”, Device ID )[/sub]
For example here I am setting the max dim level of a Fibaro dimmer to 15% by setting variable 12 which is 1 byte decimal to the value of 15:
[sub]
luup.variable_set( “urn:micasaverde-com:serviceId:ZWaveDevice1”, “ConfiguredVariable”, “12,1d,15”, 48 )
luup.variable_set( “urn:micasaverde-com:serviceId:ZWaveDevice1”, “VariablesSet”, “12,1d,15”, 48 )[/sub]
IMPORTANT: Use the advanced tab in the scene and execute a “Reconfigure command” - This will send the parameters to the device.
You can set multiple parameters at once by serialising the command, ie:
[sub]luup.variable_set( “urn:micasaverde-com:serviceId:ZWaveDevice1”, “ConfiguredVariable”, “4,2d,6000,3,1d,1”, 95 )[/sub]
which is parameter 4, 2bytes decimal, value 6000, parameter 3, 1 byte decimal, value 1
The parameters will not take effect until you send and complete the reconfigure command.[/quote]
“luup.variable_set( “urn:micasaverde-com:serviceId:ZWaveDevice1”, “ConfiguredVariable”, “12,1d,15”, 48 )
luup.variable_set( “urn:micasaverde-com:serviceId:ZWaveDevice1”, “VariablesSet”, “12,1d,15”, 48 )”
What’s the difference between these two in reality?
“The parameters will not take effect until you send and complete the reconfigure command.”
Is this another code to send or an option in the scene
Problem with Sensors is that they are generally asleep until triggered.
If they are asleep then you cannot send configuration parameters to them. (well you can send them but the device is asleep and will not receive them).
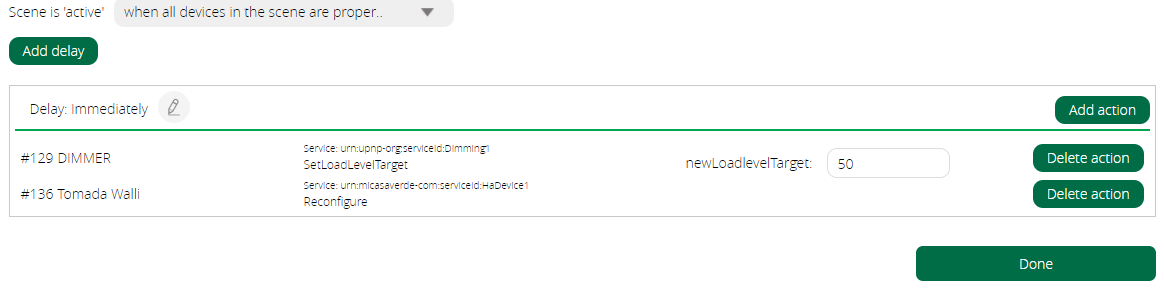
Hi, when you said: “IMPORTANT: Use the advanced tab in the scene and execute a “Reconfigure command” - This will send the parameters to the device”, do you mean this?
I would like to change the LED parameters of my FIBARO WALLI Outlet
If you are doing it in Lua, it’s:
luup.call_action( "urn:micasaverde-com:serviceId:HaDevice1", "Reconfigure", {}, device_number)
If you are doing it in Reactor, you can just use a Device Action and select Reconfigure from the action menu.
To avoid the need to use Reconfigure and send the data directly to the device with (hopefully) immediate effect (depends on the physical device):
luup.call_action( "urn:micasaverde-com:serviceId:ZWaveNetwork1", "SendData",
    { Node=NNN, Data=ZZZ }, 1 )
For NNN, you need to put in the ZWave node number of the device. This is not the same as the device number. To find the ZWave node number, go into the device control panel, Advanced > Params tab, and find the altid. That’s the node number to use here.
For ZZZ, it’s a specially constructed string containing numbers with spaces between, which are the bytes to be sent. The general form for setting configuration parameters is: "x70 4 ppp size b1 ... bn". The x70 (hex 70 = decimal 112) is the command class (configuration). The 4 that follows is the command (set, decimal 4). Then ppp should be given as the parameter number you are going to change, from the device documentation, followed by the parameter size, which may be 1, 2, or 4 (bytes). Then that number of bytes must then follow. So based on your other code published in another thread, this command string should set your dimmer LED to blue (I don’t have your devices so I can’t test and I’m relying on the accuracy of your other code for parameter numbers and values): "x70 4 11 1 4". That’s “set configuration parameter 11 to the one-byte value 4”.
Keep the node numbers and device numbers straight. The SendData action is always sent to device #1, the ZWave controller, so the last parameter in call_action() for SendData actions is always 1. The target device for configuration is given by the Node parameter to the action, and must be a ZWave node number (altid from the device Params tab), not a Luup device number.
Also, where the Vera UI makes you choose decimal or hex when specifying the size of the value, it does not matter here. If you give a number with an x in front of it (e.g. x70) that’s hex. If there’s no x, it’s assumed to be decimal. So there is no difference between “one byte hex” and “one byte decimal” in the size field for SendData, it’s just one, two or four bytes. Whether the bytes are hex or decimal is only a function of how you enter it.
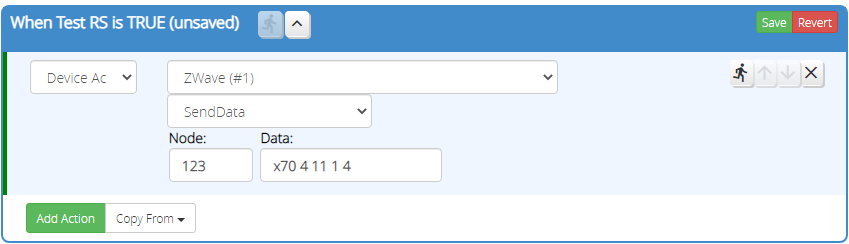
BTW, if you are doing this in a ReactorSensor activity, you can use a Device Action, directly select device #1 (“ZWave”), and choose the SendData action; no Lua is needed at all: